Programming is a very broad discipline that offers hundreds of possibilities when configuring a website. One of its best-known components is HTML, since it is the markup language from which all the content we see on the pages is defined, and next to it is CSS, oriented towards its design and appearance. In fact, although many people are unaware of what HTML and CSS are , it is very likely that they enjoy their applications every day when browsing the web.
Let's look at the purpose of HTML:
- HTML is an essential markup language for web development because it allows us to define the structure of the web page, the content that will be displayed in the browser. Its acronym stands for "HyperText Markup Language" in English.
- CSS is a rules-based language that allows us to assign styles to the elements of our web page. Its acronym stands for "Cascading Style Sheets."
HTML works together with CSS to create the web pages we use every day in the browser. Some interactive web pages also use JavaScript.
Fact: HTML files have extension .html and CSS files have extension .css. Consider that right now you are viewing a web page that was created with HTML and CSS.
Now let's start looking at the basics of HTML. Here we have an example of a very simple web page:
Example:

Tip: In HTML, indentation (the space or indentation that we place before the lines) is very important because it allows us to visually distinguish the structure of the web page in the file. Although it is not mandatory, it is recommended to use it to more easily understand the structure of the page. It is recommended to leave 2 spaces for each level of indentation..
Let's look at the main components you can use in HTML:
An HTML file is made up of HTML elements. These elements are individual components in HTML that allow us to create the structure of the page. This is an example of an element:
<h1>Mi página Web</h1>
Tip: Certain elements can contain other elements and create more complex structures. When nesting elements inside each other, the internal elements should be indented to reflect this structure, as in our example above.
Each element has an associated tag. We can create an element using its tag in our HTML file.
These are examples of commonly used tags:
-
<html> - all page content must be between these tags. -
<head> - this element contains the title of the page that you can see in your browser tab and also contains metadata. -
<body> - this element contains all the visible elements of the web page. The entire page structure must be between these tags. -
<h1>, , , , , - these elements represent headings or titles from highest to lowest importance or level on the web page.<h2> <h3> <h4> <h5> <h6> -
<p> - a paragraph. -
<a>- a link to another web page or to internal sections of your web page. -
<strong> - this label allows you to highlight important text. Usually shown in bold. -
<em> - this label allows you to highlight important text. Usually shown in italics. -
<form> - this element allows you to create a form. -
<hr> - a horizontal line that can be used to separate paragraphs or sections of your web page. -
<input> - an element that allows you to create forms because it can take text or act as a radio button or checkbox. -
<footer> - a footer.
Most elements in HTML have an opening tag and a closing tag. The content of the element is written between both tags.
In the example above we are creating an element of type << /span>h1> (a level 1 header):
<h1>Mi página Web</h1>
This element has an opening tag and a closing tag to surround its content.
- The opening tag is << /span>h1>
- The closing tag is << /span>/h1>
As you can see in the following diagram:
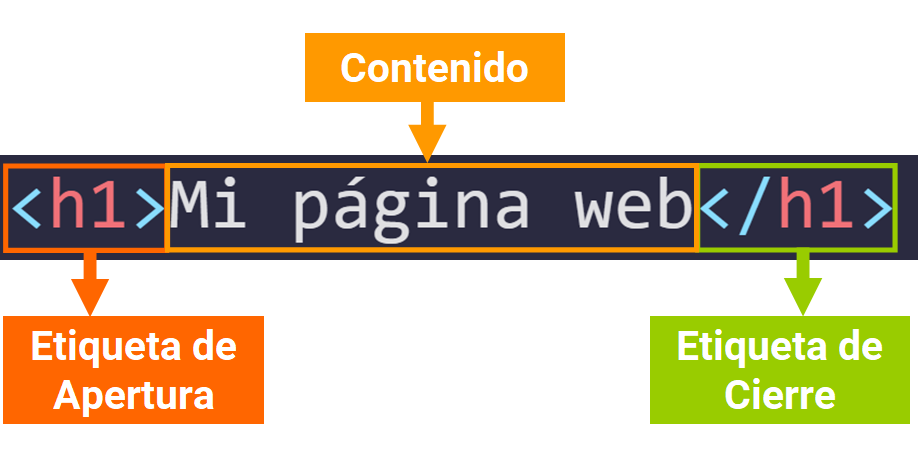
Fact:The difference between the opening tag and the closing tag is that the closing tag has a slash before the element type.
However, some elements do not need a closing tag because they do not act as containers. These include images:
<< /span>img src="freeCodeCamp.jpg">HTML elements can have attributes that allow us to describe additional information about the element. These include class, id, style, lang, src, and href.
Here we have an example of an HTML element with the attribute class:
<h1 class="titulo-principal">Mi página Web</h1>
- The attributes must be written in the opening tag, before the closing angle bracket.
- Attributes are se parated by an equal sign = from their value. On the left we write the name of the attribute and on the right we specify its value. In this example, the value is titulo-principal.
- The attribute value must be surrounded by quotes.
Fact:Each element type has a specific set of attributes that we can assign and each attribute has a set of possible values.
You can specify the primary language of the web page or any element in the structure with the langcorresponding language attribute and code:
<html lang="es">
In HTML you can create links to other web pages and internal sections of your web page with the element
<< /span>a
For example, this element would take you to the freeCodeCamp website in Spanish:
<a href="https://www.freecodecamp.org/espanol/">freeCodeCamp</a>
- The attribute href allows us to specify the destination of the link. Its value is the destination of the link .
- The text we write between the labels << /span>a> << /span>/a> is the text the user will see. In this case, the text is freeCodeCamp.
The complete documentation can be found on the next page.freecodecamp